지난 시간에 이어,
이번 글에서는 안드로이드 구글 플레이스토어 인앱결제를 지원하는 서버 구현에 대해 이야기해보겠습니다.
참고) Google Play 결제 시스템 개요 공식문서
사전 준비
Google play server API 호출을 위해서는 Access Token을 발급 받아야합니다.
Access Token 발급에 필요한 JWT 생성을 위해 서비스 계정을 만들고 private key를 준비해보겠습니다!
참고) Google Play Developer API 공식문서
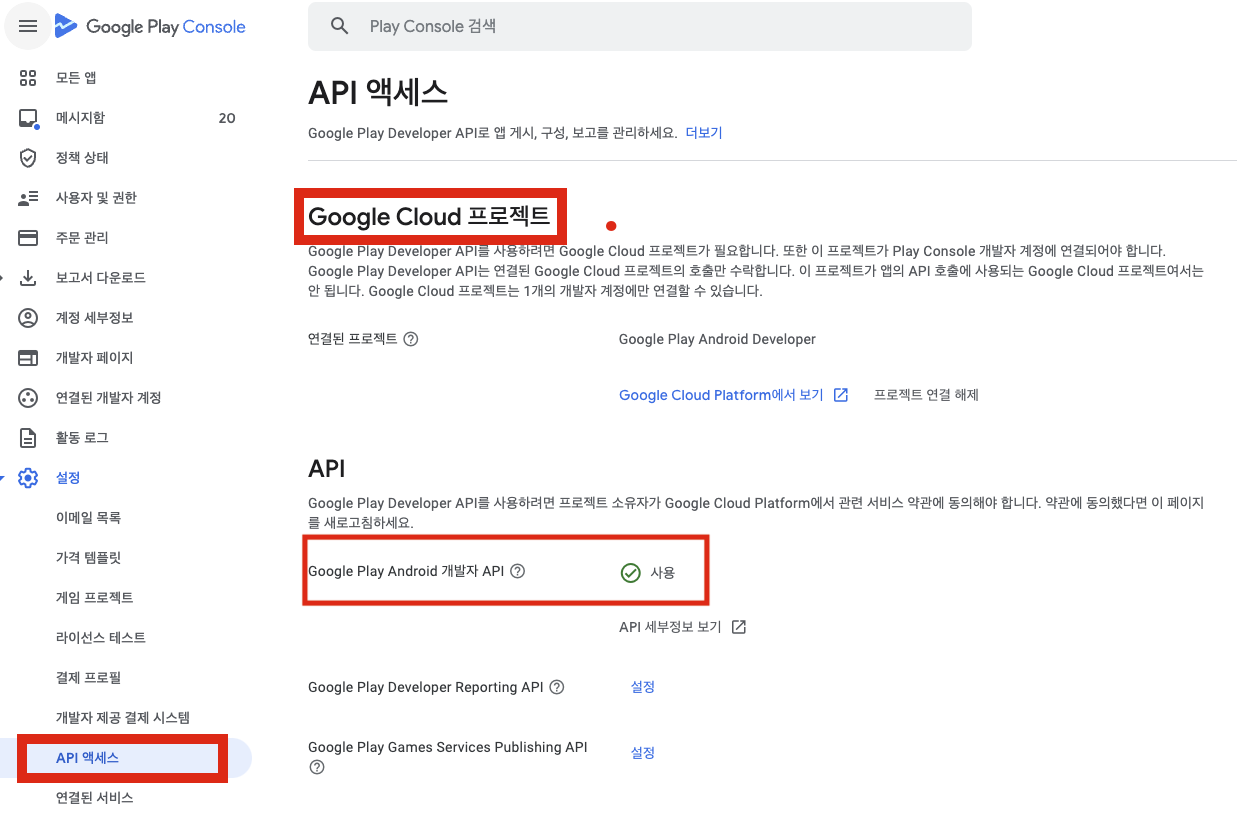
Google Cloud 프로젝트에 개발자 계정 연결 및 연결된 프로젝트에 Google Play Developer API 사용 설정
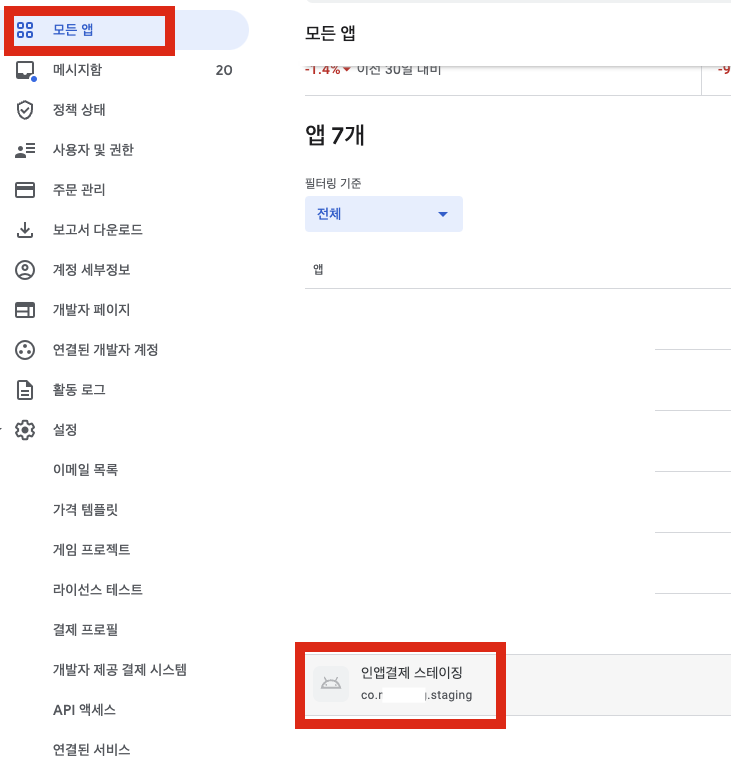
1. Google Play Console 로그인
2. 설정 > API 액세스 > 프로젝트 생성 / 연결 > Google Play Android 개발자 API 사용 확인
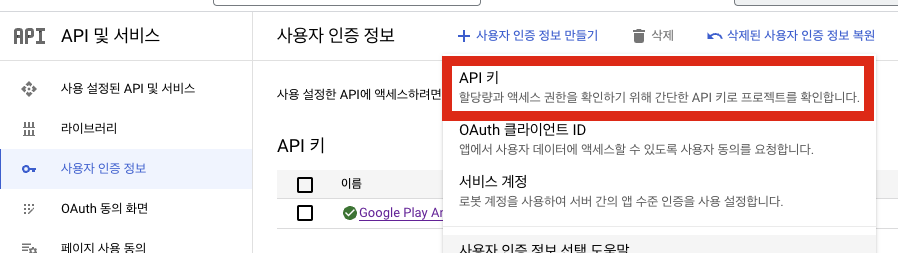
Google Play Developer API에 대한 API 키 승인
3. Google Cloud Platform Console 로그인
4. 2번에서 연결한 프로젝트 선택 > API 및 서비스 메뉴

5. 사용자 인증 정보 > 사용자 인증 정보 만들기 > API 키
Google Play Developer API에 액세스할 수 있는 Google Play Console 권한을 가지는 서비스 계정 설정
6. 사용자 인증 정보 > 서비스 계정 관리

7. 서비스 계정 만들기

8. 서비스 계정 생성 확인

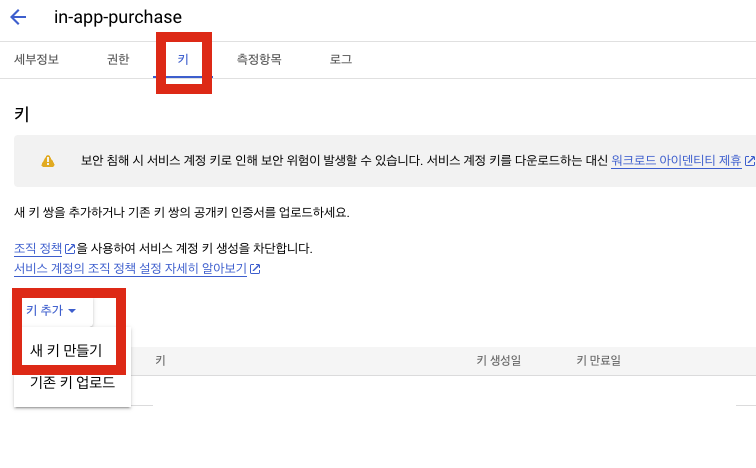
Private Key 다운로드 (.json)
9. 서비스 계정 선택 > 키 > 키 추가 > 새 키 만들기
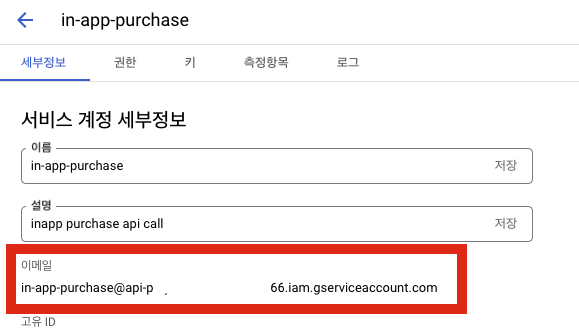
Service Account Email
10. JWT 생성에 필요한 service account email도 저장해둡니다.
Service Account 권한 설정
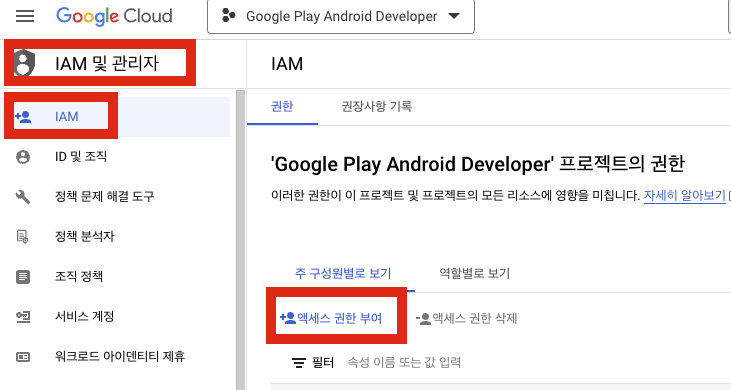
11. IAM 및 관리자 > IAM > 권한 > 액세스 권한 부여
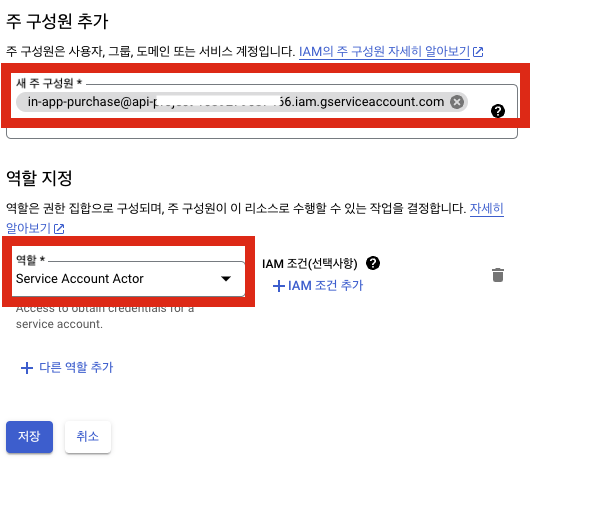
12. 서비스 계정 email 추가, 역할 > Service Account Actor 선택 후 저장
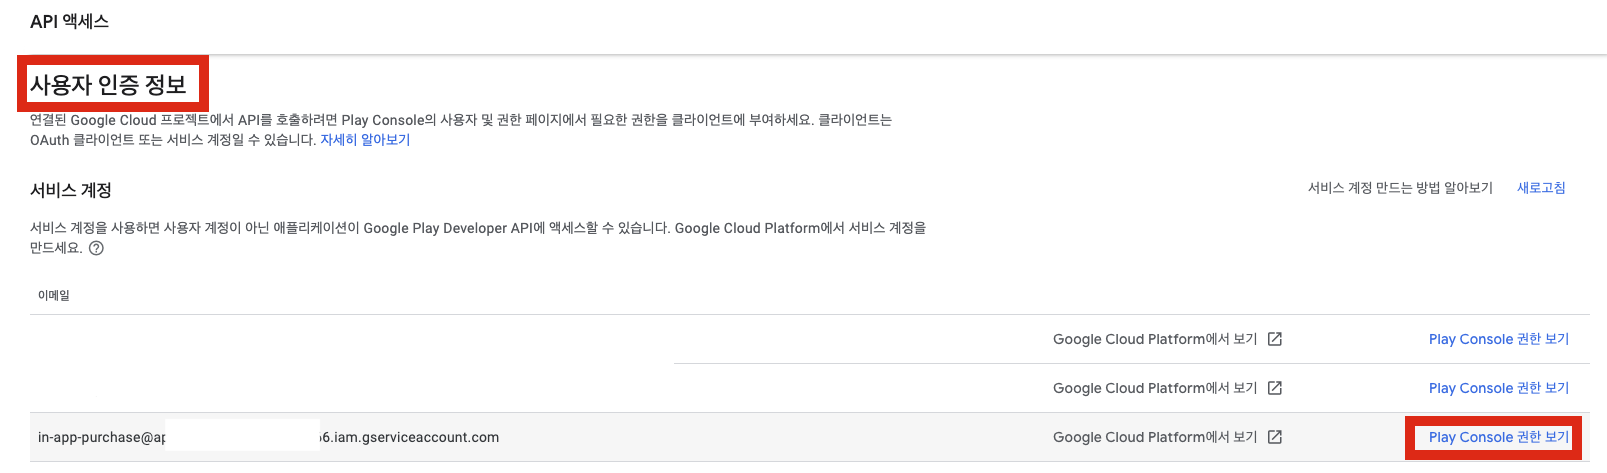
13. Google Play Console에서 서비스 계정 확인 > Play Console 권한 보기
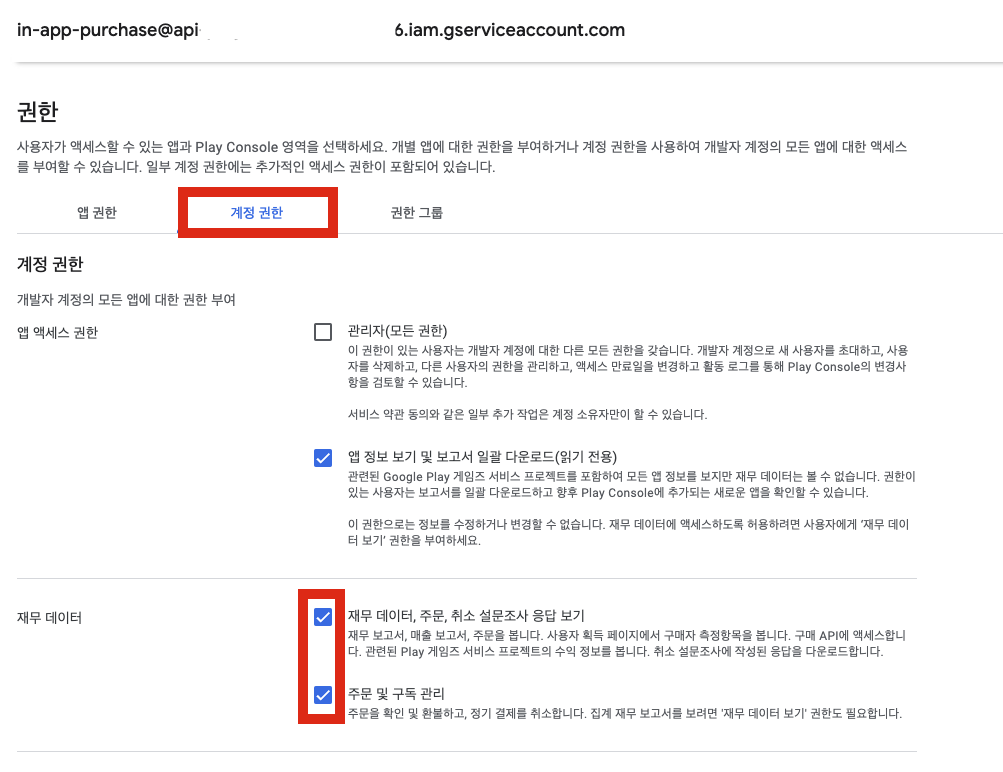
14. 권한 > 계정 권한 > 재무 데이터 권한 2개 부여
15. API 호출에 필요한 앱 package name도 저장해둡니다.
구매 유효성 검증
사전 준비가 완료되었으니,
안드로이드 앱에서 발생한 인앱결제 건의 구매 유효성을 검증하는 로직을 구현해보겠습니다.
Generate JWT
Google Play Developer API를 호출하기 위해서는 각 API에 필요한 권한 정보를 포함하는 Access Token이 필요한데요,
우선 이 Access Token 발급 API 호출에 필요한 JWT를 생성해야합니다.
JWT Header
{
  "alg":"RS256",
  "typ":"JWT"
}
- alg: token encryption algorithm.
RS256
- typ: token type
JWT
JWT Payload
{
  "iss": "761326798069-r5mljlln1rd4lrbhg75efgigp36m78j5@developer.gserviceaccount.com",
  "scope": "https://www.googleapis.com/auth/devstorage.read_only",
  "aud": "https://oauth2.googleapis.com/token",
  "exp": 1328554385,
  "iat": 1328550785
}
- iss: service account email
사전 준비 10번에서 저장해둔 서비스 계정의 이메일
- scope: API 호출에 필요한 권한. 각 API 공식문서에 명시되어있음
- aud: audience.
https://oauth2.googleapis.com/token
- exp: expiration time.
JWT 만료 시각(second 단위, 60분 이내로 설정 가능)
- iat: issued at.
JWT 발급 시각
구현 코드
import * as jwt from "jsonwebtoken";

const GooglePlayTokenLifeTime = 30 * 60; // 30 minutes
const GooglePlayTokenSignAlgorithm = "RS256";
const GooglePlayTokenType = "JWT";
const GooglePlayAudience = "https://oauth2.googleapis.com/token";

interface TokenPayload {
  iss: string; // service account email
  scope: string; // permission scope of each api
  iat: number; // token issuedAt
  exp: number; // token expirationTime
  aud: string; // audience
}

interface TokenSignOptions {
  algorithm: jwt.Algorithm;
  header: {
    alg: string;
    typ: string;
  };
}

async function generateJWT(scope: string) {
  const now = Date.now();
  const issuedAt = Math.round(now / 1000); // milliseconds to seconds
  const expirationTime = issuedAt + GooglePlayTokenLifeTime;

  const privateKey = await this.getPrivateKeyFromJsonFile("privateKeyFileKey");

  const payload: TokenPayload = {
    iss: "serviceAccountEmail",
    iat: issuedAt,
    exp: expirationTime,
    aud: GooglePlayAudience,
    scope,
  };

  const signOptions: TokenSignOptions = {
    algorithm: GooglePlayTokenSignAlgorithm,
    header: {
      alg: GooglePlayTokenSignAlgorithm,
      typ: GooglePlayTokenType,
    },
  };

  const token = jwt.sign(payload, privateKey, signOptions);
  return token;
}

async function getPrivateKeyFromJsonFile(fileKey: string) {
  const file = await s3
    .getObject({
      Bucket: BUCKET,
      Key: fileKey,
    })
    .promise();
  const body = file.Body?.toLocaleString()!;
  const content = JSON.parse(body);
  const privateKey = content.private_key;

  return privateKey.replace(/$\n/, "");
}
jwt 생성은 npm jsonwebtoken 라이브러리를 사용했습니다.
사전준비 9번에서 다운로드 받은 json 파일에는 아래와같은 값들이 저장되어있습니다.
{
  "type": "service_account",
  "project_id": "api-project-123123",
  "private_key_id": "123123",
  "private_key": "-----BEGIN PRIVATE KEY-----privatekey-----END PRIVATE KEY-----\n",
  "client_email": "in-app-purchase@api-project-123123.iam.gserviceaccount.com",
  "client_id": "123123",
  "auth_uri": "https://accounts.google.com/o/oauth2/auth",
  "token_uri": "https://oauth2.googleapis.com/token",
  "auth_provider_x509_cert_url": "https://www.googleapis.com/oauth2/v1/certs",
  "client_x509_cert_url": "https://www.googleapis.com/robot/v1/metadata/x509/in-app-purchase%40api-project-123123.iam.gserviceaccount.com",
  "universe_domain": "googleapis.com"
}
이 json 파일을 읽어와 private_key의 값을 jwt sign에 사용하면 됩니다.
저는 aws s3에 이 json 파일을 저장해두고 읽어와서 사용했습니다.
API Access Token 발급
이제 생성한 JWT로 Access Token API를 호출해, Access Token을 받아옵니다.
구현 코드
import axios from "axios";


const GOOGLE_PLAY_OAUTH_TOKEN_URL = "https://oauth2.googleapis.com/token";

async function requestAccessToken(scope: string) {
  const token = await this.generateJWT(scope);

  const res = await axios({
    url: GOOGLE_PLAY_OAUTH_TOKEN_URL,
    method: "POST",
    headers: {
      "Content-Type": "application/x-www-form-urlencoded",
    },
    params: {
      grant_type: "urn:ietf:params:oauth:grant-type:jwt-bearer",
      assertion: token,
    },
  });

  return res.data.access_token as string;
}
POST request parameter의 assertion으로 앞서 생성한 JWT를 포함해야합니다.
여기서 삽질을 좀 했는데, JWT를 header.bearer로 넘기면 안되고 명시된대로 parameter로 넘기셔야합니다!!
이 request에 대한 response는 다음과같은 형태입니다.
{
  "access_token": "1/8xbJqaOZXSUZbHLl5EOtu1pxz3fmmetKx9W8CV4t79M",
  "scope": "https://www.googleapis.com/auth/prediction"
  "token_type": "Bearer",
  "expires_in": 3600
}
구매 정보 가져와 상태값 확인 (ProductPurchase Get API)
이제 발급받은 access token으로 ProductPurchase Get API을 호출하면 사용자의 구매 데이터를 불러올 수 있습니다.
그리고 구매 데이터의 purchaseState가 구매완료(0)인지 확인하면 유효성 검증 로직은 완료입니다!
jwt 생성시 scope는 API 문서에 명시되어있는대로 다음과같이 설정하면 됩니다.

그리고 앱에서 인앱결제가 발생했을 때, 안드로이드는 각 결제건을 purchaseToken 값으로 identify하는데,
이 purchaseToken은 다음과같은 형태의 문자열입니다.
hhhhhxxxxooooooo.AO-J1OxEQ5kcxxxxxxFQ2U7xxxxxegrhRxxxxxpFbUEA
구현 코드
import axios from "axios";


const GOOGLE_PLAY_SERVER_API_DOMAIN = "https://androidpublisher.googleapis.com";

async function validatePurchase(purchaseToken: string, productId: string) {
    const scope = "https://www.googleapis.com/auth/androidpublisher";

    const accessToken = await this.requestAccessToken(scope);
    const path = `androidpublisher/v3/applications/${packageName}/purchases/products/${productId}/tokens/${purchaseToken}`;

    const res = await callAPI(path, accessToken);

    if (res.purchaseState !== 0) {
      throw new Error();
    }
  }

  async function callAPI(
    path: string,
    token: string
  ) {
    try {
      const res = await axios({
        url: `${GOOGLE_PLAY_SERVER_API_DOMAIN}/${path}`,
        method: "POST",
        headers: {
          Authorization: `Bearer ${token}`,
          "Content-Type": "application/json",
        },
      });

      return res.data;
    } catch (e) {
      throw new Error();
    }
  }
정상적으로 API가 호출되었다면, response는 아래와같은 형태입니다.
{
  "purchaseTimeMillis": "1688371475787",
  "purchaseState": 0,
  "consumptionState": 1,
  "developerPayload": "",
  "orderId": "GPA.xxxx-xxxx-xxxx-xxxx",
  "purchaseType": 0,
  "acknowledgementState": 1,
  "kind": "androidpublisher#productPurchase",
  "regionCode": "KR"
}
안드로이드 인앱결제를 구현할 때는 이 마지막 API 호출할 때 가장 삽질을 많이 했습니다 🥲
저희 앱 클라이언트는 Flutter storekit로 인앱결제가 구현되어있는데,
결제 완료 후에 앱에서 받는 response에 명시적으로 purchaseToken이라는 값이 없어서 IOS 인앱결제건의 transactionId에 해당하는 field의 값이 purchaseToken일 것이라고 생각하고 API를 호출했는데 돌아오는 것은.. 아래의 400에러 리스폰스..
{
  "error": {
    "code": 400,
    "message": "Invalid Value",
    "errors": [
      {
        "message": "Invalid Value",
        "domain": "global",
        "reason": "invalid"
      }
    ]
  }
}
access token이 잘못되었는지, JWT가 잘못되었는지까지 한참 확인하다가
앱 개발자분께서 이게 purchase token일 수도 있다고 보내주신 값을 넣으니 드디어 정상 response를 받을 수 있었습니다 😭
정상 response를 받고보니 처음에 purchaseToken이라고 생각했던 값은 orderId(GPA.xxxx-xxxx-xxxx-xxxx) 였습니다.. ㅎㅎ
구현 자체는 어렵지 않았지만 공식 문서들이 생각보다 자세하지 않아서 꽤 오래 걸린 작업이었는데,
이 글을 보시는 분들께서는 이런 어려움을 겪지 않으셨으면 좋겠습니다 :)
'개발 > Node.js, TypeScript' 카테고리의 다른 글
| [NestJS] Prisma Transaction (0) | 2025.03.02 |
|---|---|
| [NestJS] 로컬에서 스크립트 실행하기 (feat. nestjs-command) (0) | 2025.02.16 |
| [NestJS] 마이크로서비스와 하이브리드 애플리케이션 구성하기 (2) | 2025.02.02 |
| [Node.js] 인앱결제 서버 개발기1 (앱스토어) (2) | 2023.07.19 |


